Important Note: We recommend trying Duo first. Authy is no longer fully supported by the developers. When enabled, Two-Factor Authentication (2FA) increases your account’s security by requiring a second method of verification before you can login to No-IP.com’s website.
2FA Setup Instructions
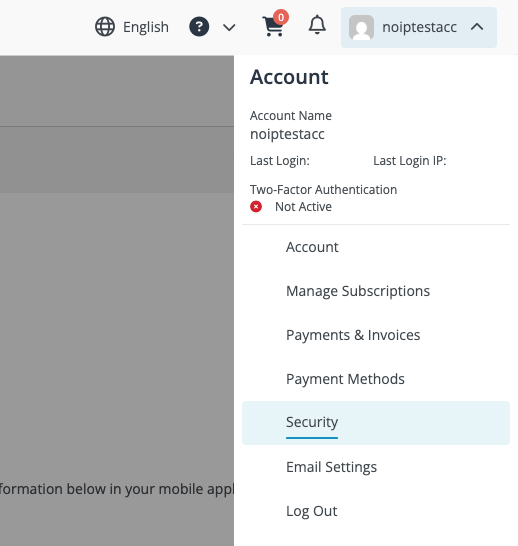
1. Navigate to the Security page. Login to your No-IP account and click your username on the top right of the screen. In this menu, click Security.
2. Download and install an authentication app. This article will be using Authy (Twilio Authy on iOS). If you’d rather use a different app see our articles for Duo, LastPass or 1Password. They’re all available on the Play Store for Android or the App Store for iOS.
3. Open the Authy app and click the empty field labeled Code and select your country. Then enter your phone number and click OK.
4. Verify your number for Authy. Choose to either receive an SMS text message or a phone call to receive your verification code.
5. Return to the app. Depending on your phone settings Authy may see the code automatically upon returning to the app or you may need to enter the code that was sent to you into the Authy app.
6. You should now see a screen that allows you to add an account or a screen with a code. Click the button to add an account or tap the three dots on the top right of the screen and then select Add Account You will be given two options: “Scan QR Code” or “Enter Code Manually”. Select whichever you prefer. We have provided instructions for each method below.
QR Code
-
Authy will ask for permission to use your phones camera. Give it permission and then scan the QR Code from the security page in your No-IP account.
-
Authy will take you to a page labeled “Secure Backups” feel free to use this feature. We offer backup passwords later on in this article so you don’t need to use this unless you find it convenient. If you don’t want to use it tap the dots on the top right and select “Skip” and then “Ignore”.
-
On the next page you’ll see the No-IP logo. Feel free to change any of the information or leave it as is.
-
You’ll now get the 6 digit code to enter into the Security page of your No-IP account. Enter in your No-IP account password and the 6 digit code you see on the Authy app. The code resets every 30 seconds so if it changes before you enter in the code you will have to enter in the new code that appears.
-
As soon as you enable Two-Factor Authentication you will be given a list of codes. Do not navigate away from this page. Skip to the Backup Codes section in this article.
-
If you selected to enter a code manually you will be taken to a page asking you for a key. The key is found on the Security page of your No-IP account underneath the QR code.
-
Authy will then take you to a page labeled “Secure Backups” feel free to use this feature. We offer backup passwords later on in this article so you don’t need to use this unless you find it convenient. If you don’t want to use it tap the dots on the top right and select “Skip” and then “Ignore”.
-
You’ll then be prompted to select a logo for the authentication. You can simply search for noip to get our logo for the authentication. Hit continue when you’re ready.
-
You’ll be asked for an account nickname. You can name it your account username/email or enter a new name.
-
You’ll then be presented with a screen with a 6 digit code. Before doing anything with that code fill in the password field on the no-ip security page with your no-ip account password.
-
Add the 6-digit code from Duo to the security page in your account and click “Enable Two-Factor Authentication”. The code will change every 30 seconds so you’ll need to enter in the 6 digit code on the Security page within that time frame.
-
Two-Factor Authentication is now enabled. Make sure to not navigate away from the page with the backup codes and proceed to the backup codes section in this article.